So, it has been a really long time since we last posted anything here but we haven't just been lazing around doing nothing.
You may remember that we finished filming By The Light Of The Moon before christmas and then went very quiet. Since then we have finished the edit and begun the post production phase which has already yielded some very cool results but due to the amount of VFX involved and the fact that everyone is donating their time free it is a slow process. As soon as we have some finished shots we will be putting together a trailer and letting everyone know about it.
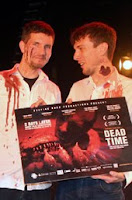
In the meantime we have filmed and edited our entry for this years 2 Days Later comp. In 2010 we won two awards for Dead Time and we are hoping to do just as well with this years entry Dead Dream which tells the story of an abused wife who takes misguided revenge from beyond the grave.
We will be keeping the film under wraps until the comp is over but will preview some stills here as soon as the colouring is finished on the final edit.
Wednesday, 7 September 2011

Sunday, 27 February 2011
Behind the scenes
It's been a while since the last update but we are still here and still working on the film. Editing is coming along slower than we had hoped but we are getting there and it's looking really good so far and will be worth the wait.
Originally we had hoped to have the editing done by sometime in March but that date will almost certainly get pushed back now though hopefully not by too much and in the mean time we have a little behind the scenes feature to keep entertained while you wait. It was put together by our good friends at Real Time who also leant us a whole bunch of kit for the shoot and came along to for an evening to make sure we treated their green screen with the proper respect.
The film is now live on their site and does a great job of making us sound almost like we know what we are doing so go check it out right now!
WATCH THE BEHIND THE SCENES FEATURETTE
Originally we had hoped to have the editing done by sometime in March but that date will almost certainly get pushed back now though hopefully not by too much and in the mean time we have a little behind the scenes feature to keep entertained while you wait. It was put together by our good friends at Real Time who also leant us a whole bunch of kit for the shoot and came along to for an evening to make sure we treated their green screen with the proper respect.
The film is now live on their site and does a great job of making us sound almost like we know what we are doing so go check it out right now!
WATCH THE BEHIND THE SCENES FEATURETTE
Sunday, 12 December 2010
That's a wrap.

It has been very tiring, sometimes frustrating and occasionally very very cold but also a lot of fun and we managed to punctuate the filming with enough eating, drinking and Call of Duty to make it feel almost like a holiday.
Now begins the next stage of logging the huge amount of footage that we have come away with. In true Red Ded Dog style we just filmed everything from every angle we could think of in the hope that this way we won't find ourselves missing that one vital shot when we finally get to the edit.
We have nothing to worry a bout though. Checking the rushes each night brought a grin to our faces without fail and seeing the first rough VFX tests just made it even bigger. There is no question that we have some great performances from a great cast and have got everything we need and more to make a really good film.
We hope to have some kind of teaser/trailer type thing to show at Stand Up Cinema on the 17th so get yourselves to that if you can. In the meantime here are some stills taken whilst shooting so you can relive the joy. This album will be expanded when we have collected all the pictures together.

Thursday, 9 December 2010
By the Light of the Moon - Filming Update
 |
| A big thank you to our primary sponsors |
We began filming on the 1st of December after a day and a half of read throughs and rehearsals and have been living on set and filming every day since.
 |
| First contact |
We would like to say a massive thank you to Stu who agreed to play our alien for us without really realising exactly what we had in mind for it and ended up with head and hands entirely covered in silicone and wearing a wet suit for many hours, unable to eat, drink or smoke and having to stand in the garden when the sweat inside his mask got so much that it was running out of the nose holes.
 |
| Alien concept #1 |
We would like to also say a couple more thank yous. To Real Time for the loan of lights, green screen and assorted other kit and also to Sterling Recruitment who had enough faith in us to step in with funding for this project and without whom this film would probably not have happened.
We also have a date for your diaries. Real Time host Stand Up Cinema every month and have agreed to let us screen something at the next one which is taking place on Dec 17th at The Rising Sun Arts Center in Reading. We will be showing some of our earlier films but will also be giving the first screening of the trailer for By the Light of the Moon so if you like what you see here then get yourself down on the 17th for some more.
 |
| Alien concept #2 |
We also have a date for your diaries. Real Time host Stand Up Cinema every month and have agreed to let us screen something at the next one which is taking place on Dec 17th at The Rising Sun Arts Center in Reading. We will be showing some of our earlier films but will also be giving the first screening of the trailer for By the Light of the Moon so if you like what you see here then get yourself down on the 17th for some more.
Saturday, 27 November 2010
Platsil Gel-10
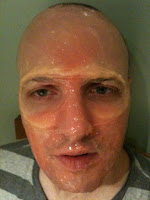 Recently we have been playing around with using silicone for our effects instead of latex and though we are still a long long way from becoming makeup effects experts we have learnt a couple of things that are useful to know.
THICKENER
Without this the only effect you can achieve is making it look like you got sneezed on by a giant as un thickened silicone is pretty runny and can't be shaped or sculpted at all. This can be a good thing as it is self levelling which means you can get a really nice smooth finish if you can stop it going everywhere.
If you want to make any kind of shapes then a squirt of thickener will let you sculpt directly on to your subject and the silicone will hold its shape even before it starts to go off.
TIMING
Although Gel-10 has a working time of only a few minutes before it starts to set you don't actually have to rush as much as you would think. Five minutes is a pretty long time really so just make sure you mix up batches that are as small as possible and you wont have to race against the clock
 COLOUR
Silicone pigment is pretty expensive so we only had really bright, hammer horror red and generic skin pink which was not really any good for what we wanted so we tried to colour it with acrylic paint the way we would do with latex. Bad move.
Silicone does not go off when mixed with acrylic and I spent the entire 2 Days Later film comp with a very sticky neck for this reason. Fork out for some proper silicone pigment and it will see you good for ages as you only need to use a drop each time.
HAIR
We learnt through pain that latex does not come out of hair. Most people who where involved in Loki's Gate suffered a certain amount of involuntary waxing in the process but thankfully silicone is another beast all together.
While you don't want to be just pouring it all over your head it is not as much of a pain if you do get it in hair. It will come off arms without leaving a bald patch and a little vaseline will mean you can go over eyebrows and stuff as well.
PRACTICE
Silicone is really nice to work with but it is quite tricky too so just play around as much as you can. We have used up nearly 2kg of Gel-10 just getting to used to it and other than the wounds we made for 2 Days Later we have nothing really to show for it.
Big thanks to Howard for letting us cover his entire face with the stuff and Stu for going one step further and having his entire head covered including his mouth and for putting up with us accidentally siliconing his eyes shut.
We start filming our latest project on Wednesday and this will feature our first sunscreen silicone work. We will keep you posted on this and hope to have something for you all to see by the end of the year.
Tuesday, 16 November 2010
Clive Is Alive!

So much good stuff has been said about the alien baby we made for Dead Time (who we lovingly named Clive) that we thought we would do a post about how we made him. Full credit has to go to Effie (who also played Jo in the film) for doing nearly all the work on the build.
Whenever we try to do a new effect it always starts off looking rubbish but we have learned that the secret is to push on through that stage and just believe that when it is finished and in front of the camera it WILL look awesome and Clive is a great example of that.
First of we had a quick chat about what kind of creature we wanted and Woodie did us a design on paper that pretty much nailed it so we jumped straight in to the fun bit with very little planning.
The first step was justto get a basic body shape to build on to. We used old newspaper and held it in shape with parcel tape, making sure to leave hand sized spaces in the back of his head and his back to allow the puppeteers to operate him when finished.
We kept adding newspaper to smooth the shape out and attached a pair of heavy rubber gardening gloves to act as his flippers. The thumbs of the gloves are inside hi chest cavity which means the operator can get a good grip and really get him moving.
Once the basic shape was done we began covering him in a layer of more newspaper soaked in liquid latex. This covers bumps and wrinkles and dries tough, flexible and fairly waterproof which was important as we knew he would be getting covered in slime and blood for the shoot.
We also made a bladder from two sheets of dry latex stuck together and set this in to his chest with a tube attached through the back of his head so that we could make him breath.

With the latex skin dried we painted him with more latex coloured with acrylic paint. We put on a few layers, tweaking the colour and adding shading with each one.
With this done the final details where added. Webbing and ridges where built up of newspaper and latex, teeth and claws made from the prongs of plastic forks, a tongue from a latex soaked sponge and two marbles added as eyes.
After a final coat of acrylic paint he was done. A kinda nasty but kinda cute alien foetus made from stuff we had lying around the house.
On the shoot we had two people on the floor out of shot to operate him. One with their hands in his back making has flippers move and one with a hand in his head to do his mouth and to blow in to the pipe to make him breath.
We made up a big pan of really thick arrowroot blood and another of clear arrowroot slime and slopped it all over everything. Poor old Freddie, who had only come along to be camera operator, ended up on flipper duty and got totally covered in the stuff but was very professional and waited till we called cut before telling us exactly what he though of us and our stupid film :)
Check out the other photos for a full run down of the process.
Sunday, 14 November 2010
Our First Auditions
We spent the bulk of yesterday doing auditions for the remaining parts in our new project. We had one session in Reading in the afternoon and then another in the evening in London and while it was a very positive experience and threw up a few actors we definitely want to work with it was also a very very strange process.
On previous projects our preferred method of finding actors has been to pressgang people in to agreeing whilst out at the pub so we had no real idea of what to expect during a structured audition process or what was expected of us by the people who we would see and I think we where probably the most nervous people on the day.
Nearly every scene in this script involves four or five people so each reading saw one of us taking on several parts while the auditioning actor chipped in with their relevant pieces and we are very grateful that everyone we saw was very forgiving of our faffing about.
By far the weirdest thing about the audition process id the speed at which you have to greet, judge and then send people away. We gave each person 20 minutes which I am sure is longer than some but it still felt very weird and business like having to skip all small talk and drop straight in to reading a script over and over again with complete strangers.
When you meet new people, especially people with whom you share an interest, the inclination is to chat and take your time and having to the whole process in such short time was really tough.
On the positive side we were very pleased that everyone we spoke to seemed genuinely interested in the project and understood the characters and the things that we are trying to get across. This might mean that we have written a flat and obvious script but hopefully it means that we have managed to write something that conveys all the meaning and sub text that we hoped it would and that we can now start to film with a cast of really great actors.
It was a long and tiring day and something which we will be doing more of in the future but fortunately it went well and did exactly what we hoped it would.
Now bring on the filming!
Subscribe to:
Posts (Atom)